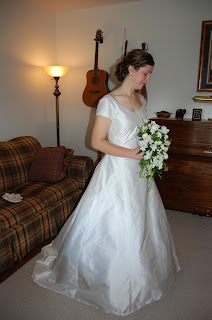
My mom sewed her wedding gown when she was married in 1985. She was so tiny! According to my grandmother, her waist was 18 inches or something ridiculously small like that. Of course, wanting to be like my mom, I decided that I should try to sew my own wedding dress (I did not try for the 18 inch waist). In fact, I did not try on a single wedding gown at David's Bridal or any other bridal store.
My Grammie and I looked through pattern books at a local fabric store for a wedding dress that would fit my criteria (sleeves and a modest neckline). We found this pattern: http://voguepatterns.mccall.com/v2788-products-16.php?page_id=186 (Vogue 2788).
I liked the silk look and decided to go with that rather than satin or sheer. Since the silk at JoAnn Fabrics looked sickly, I ordered some Dupioni silk through my aunt - she works with curtain fabrics.
So...
Week One: bodice and skirt
Week Two: attached bodice to skirt
Week Three: zipper and finishing touches
One oddity about the pattern was that it called for the skirt lining to be attached to the skirt in a seam along the bottom. I did not want the layers attached, so I hemmed the skirt and lining separately.
Another oddity about dress patterns is that the sizes that they give on the back of the pattern envelope are bigger than normal dress sizes. I am normally a size 8. According to the measurements on the envelope, I should be right between pattern size 12 and pattern size 14. I go with a pattern size 12.
Thanks to my grandmother's advice, I made the wedding dress a pattern size 12 (I almost went with the 14). And even then I had to take it in a bit more at the waist.
Here are some dress pictures!
 |
| Front View |
 |
| Back View |
 |
| Bodice |
 |
| I love how the Dupioni silk has both sheen and texture. |
 | |
| I made my slippers, too! |
For the financially minded: the fabric, buttons, zipper, and pattern for my dress cost under $150. I absolutely loved my dress - and I still love it!


